
Terminal 5, Wallis Rd, Longford, Hounslow TW6 2GA, UK N 51°28’23.55″, W 0°29’14.29″ http://maps.google.com/maps?q=loc:51.47321%2C-00.48730
My Location
N 51°52’17.33″, W 0°23’54.95″ http://maps.google.com/maps?q=loc:51.87148%2C-00.39860
Vauxhall Astra G Estate 1.7dti Diagnostics – Glow Plug Relay
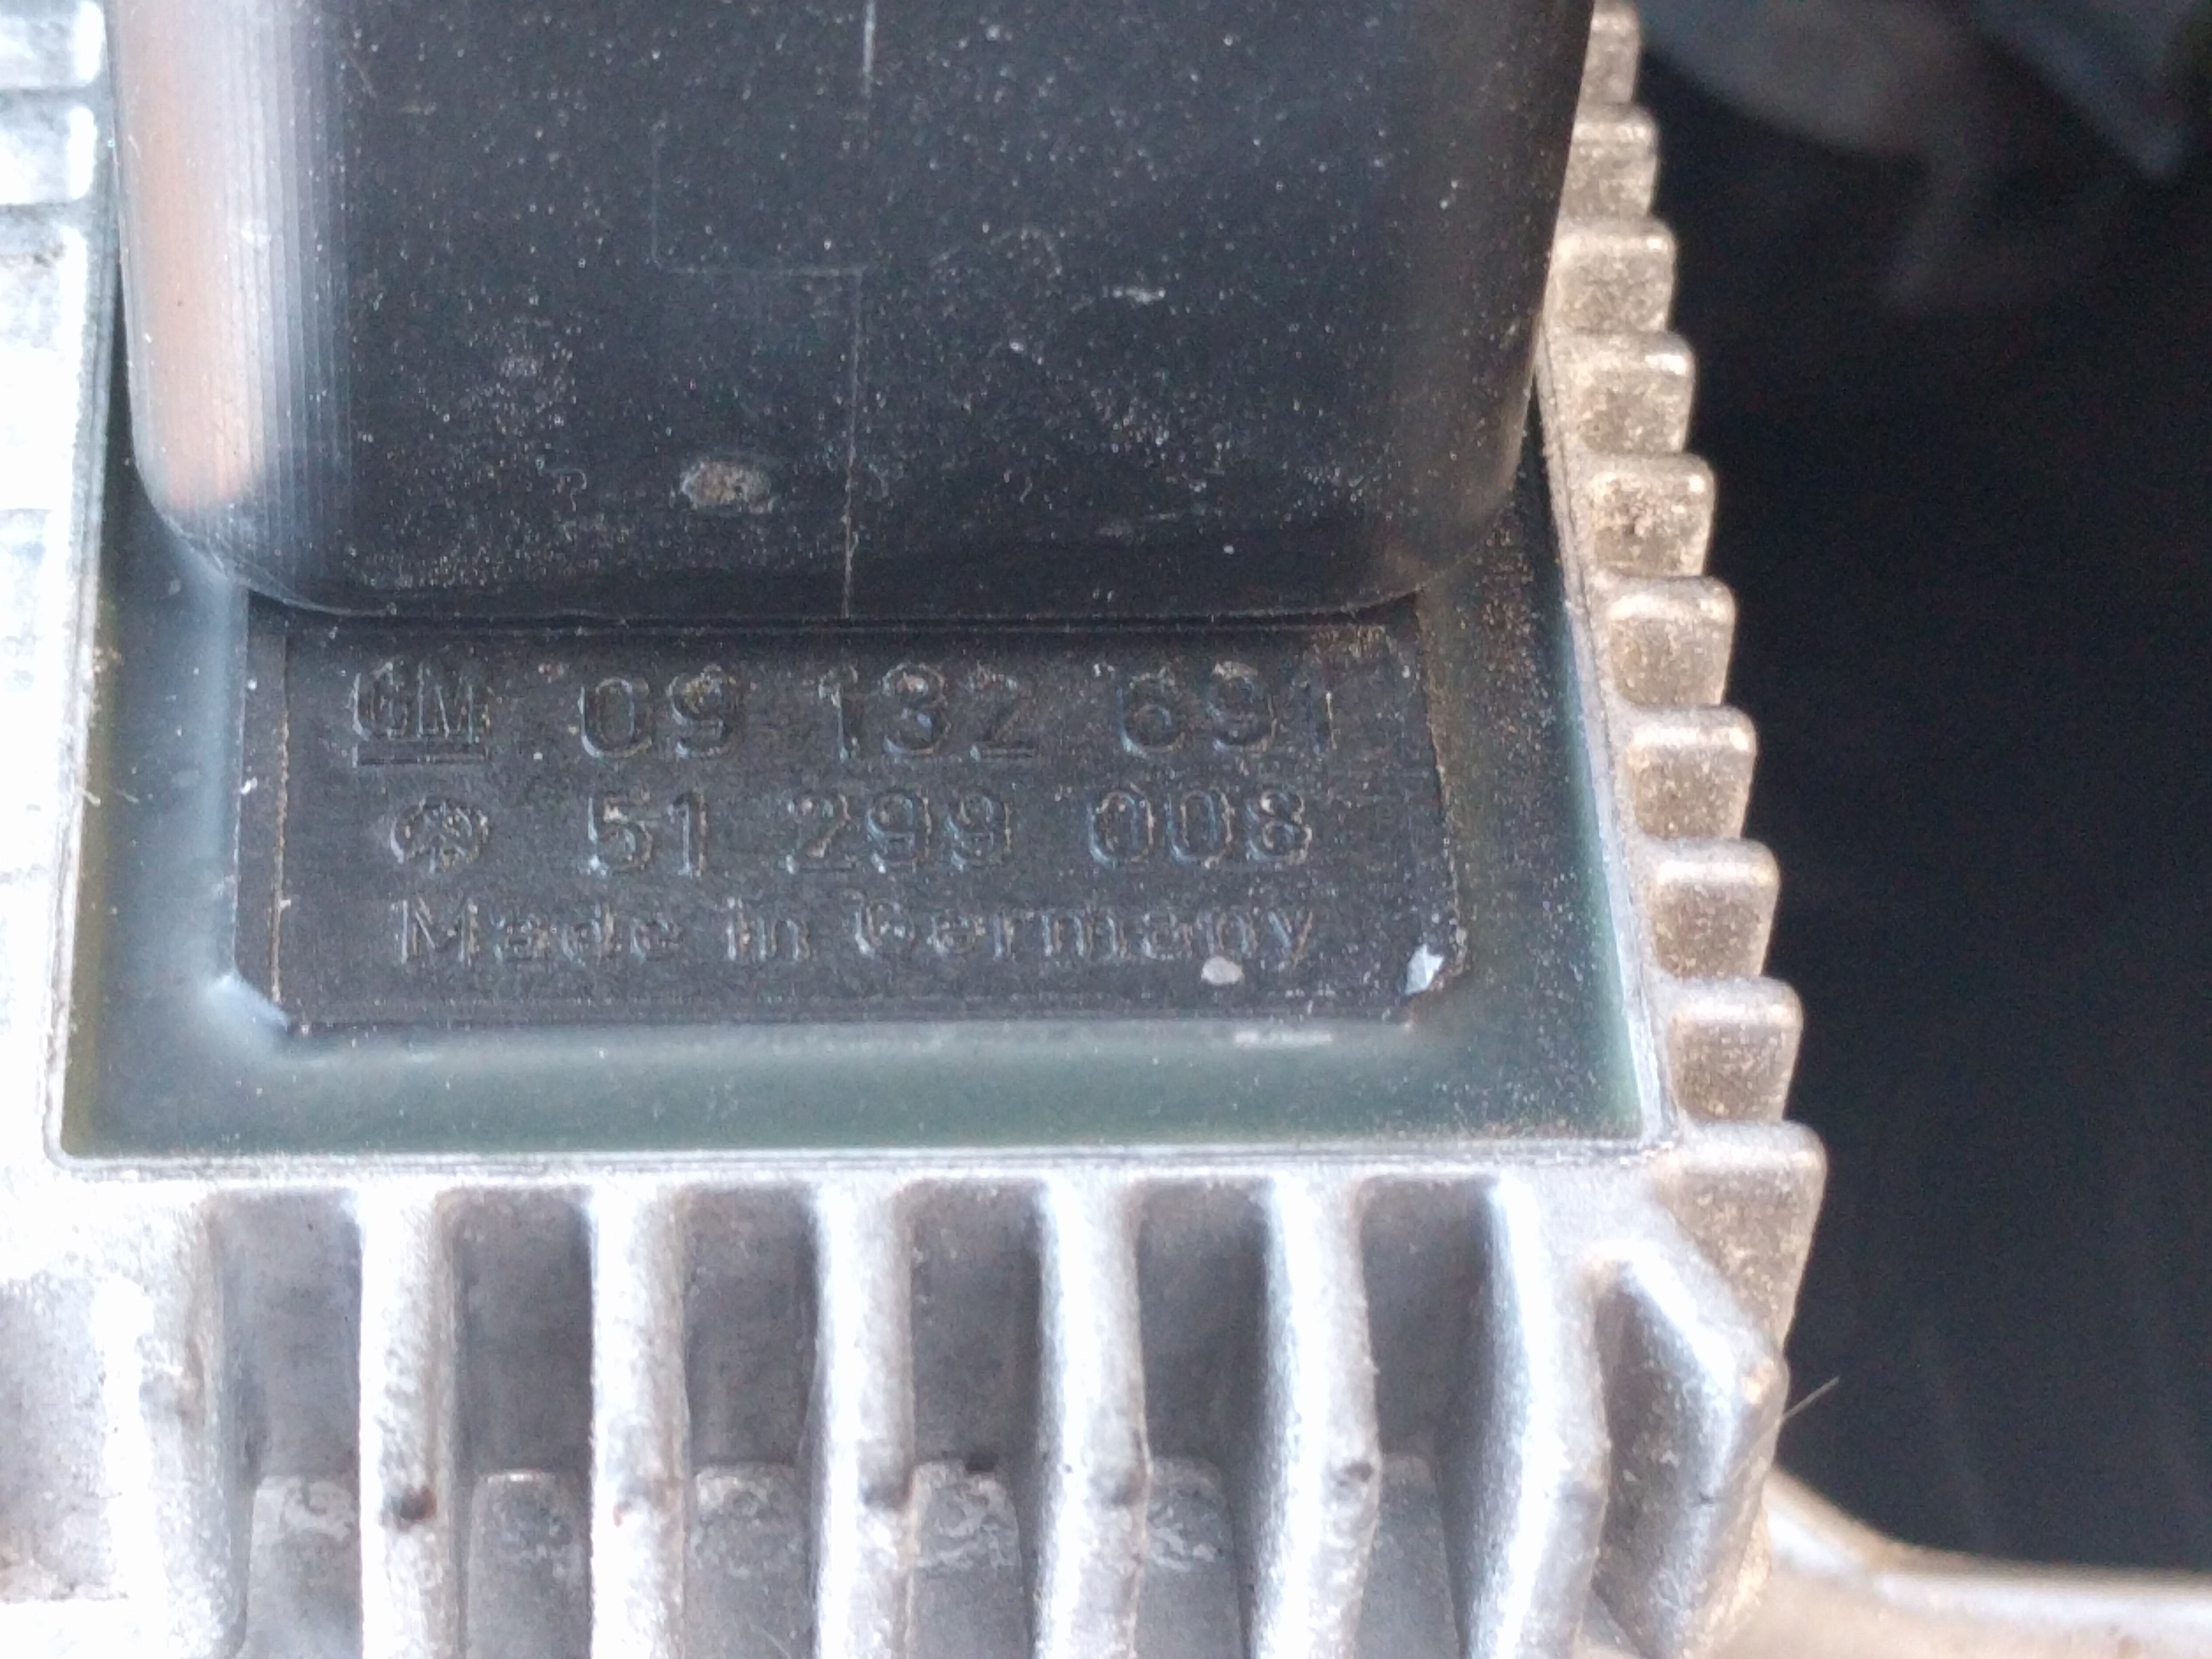
As part of my glow plug fault one of the suspected problems could be the glow plug relay so thought I would replace it. I manged to find one on ebay and the part number is
09 132 691 or 09132691
1, First locate the glow plug relay which can be found attached to the battery tray
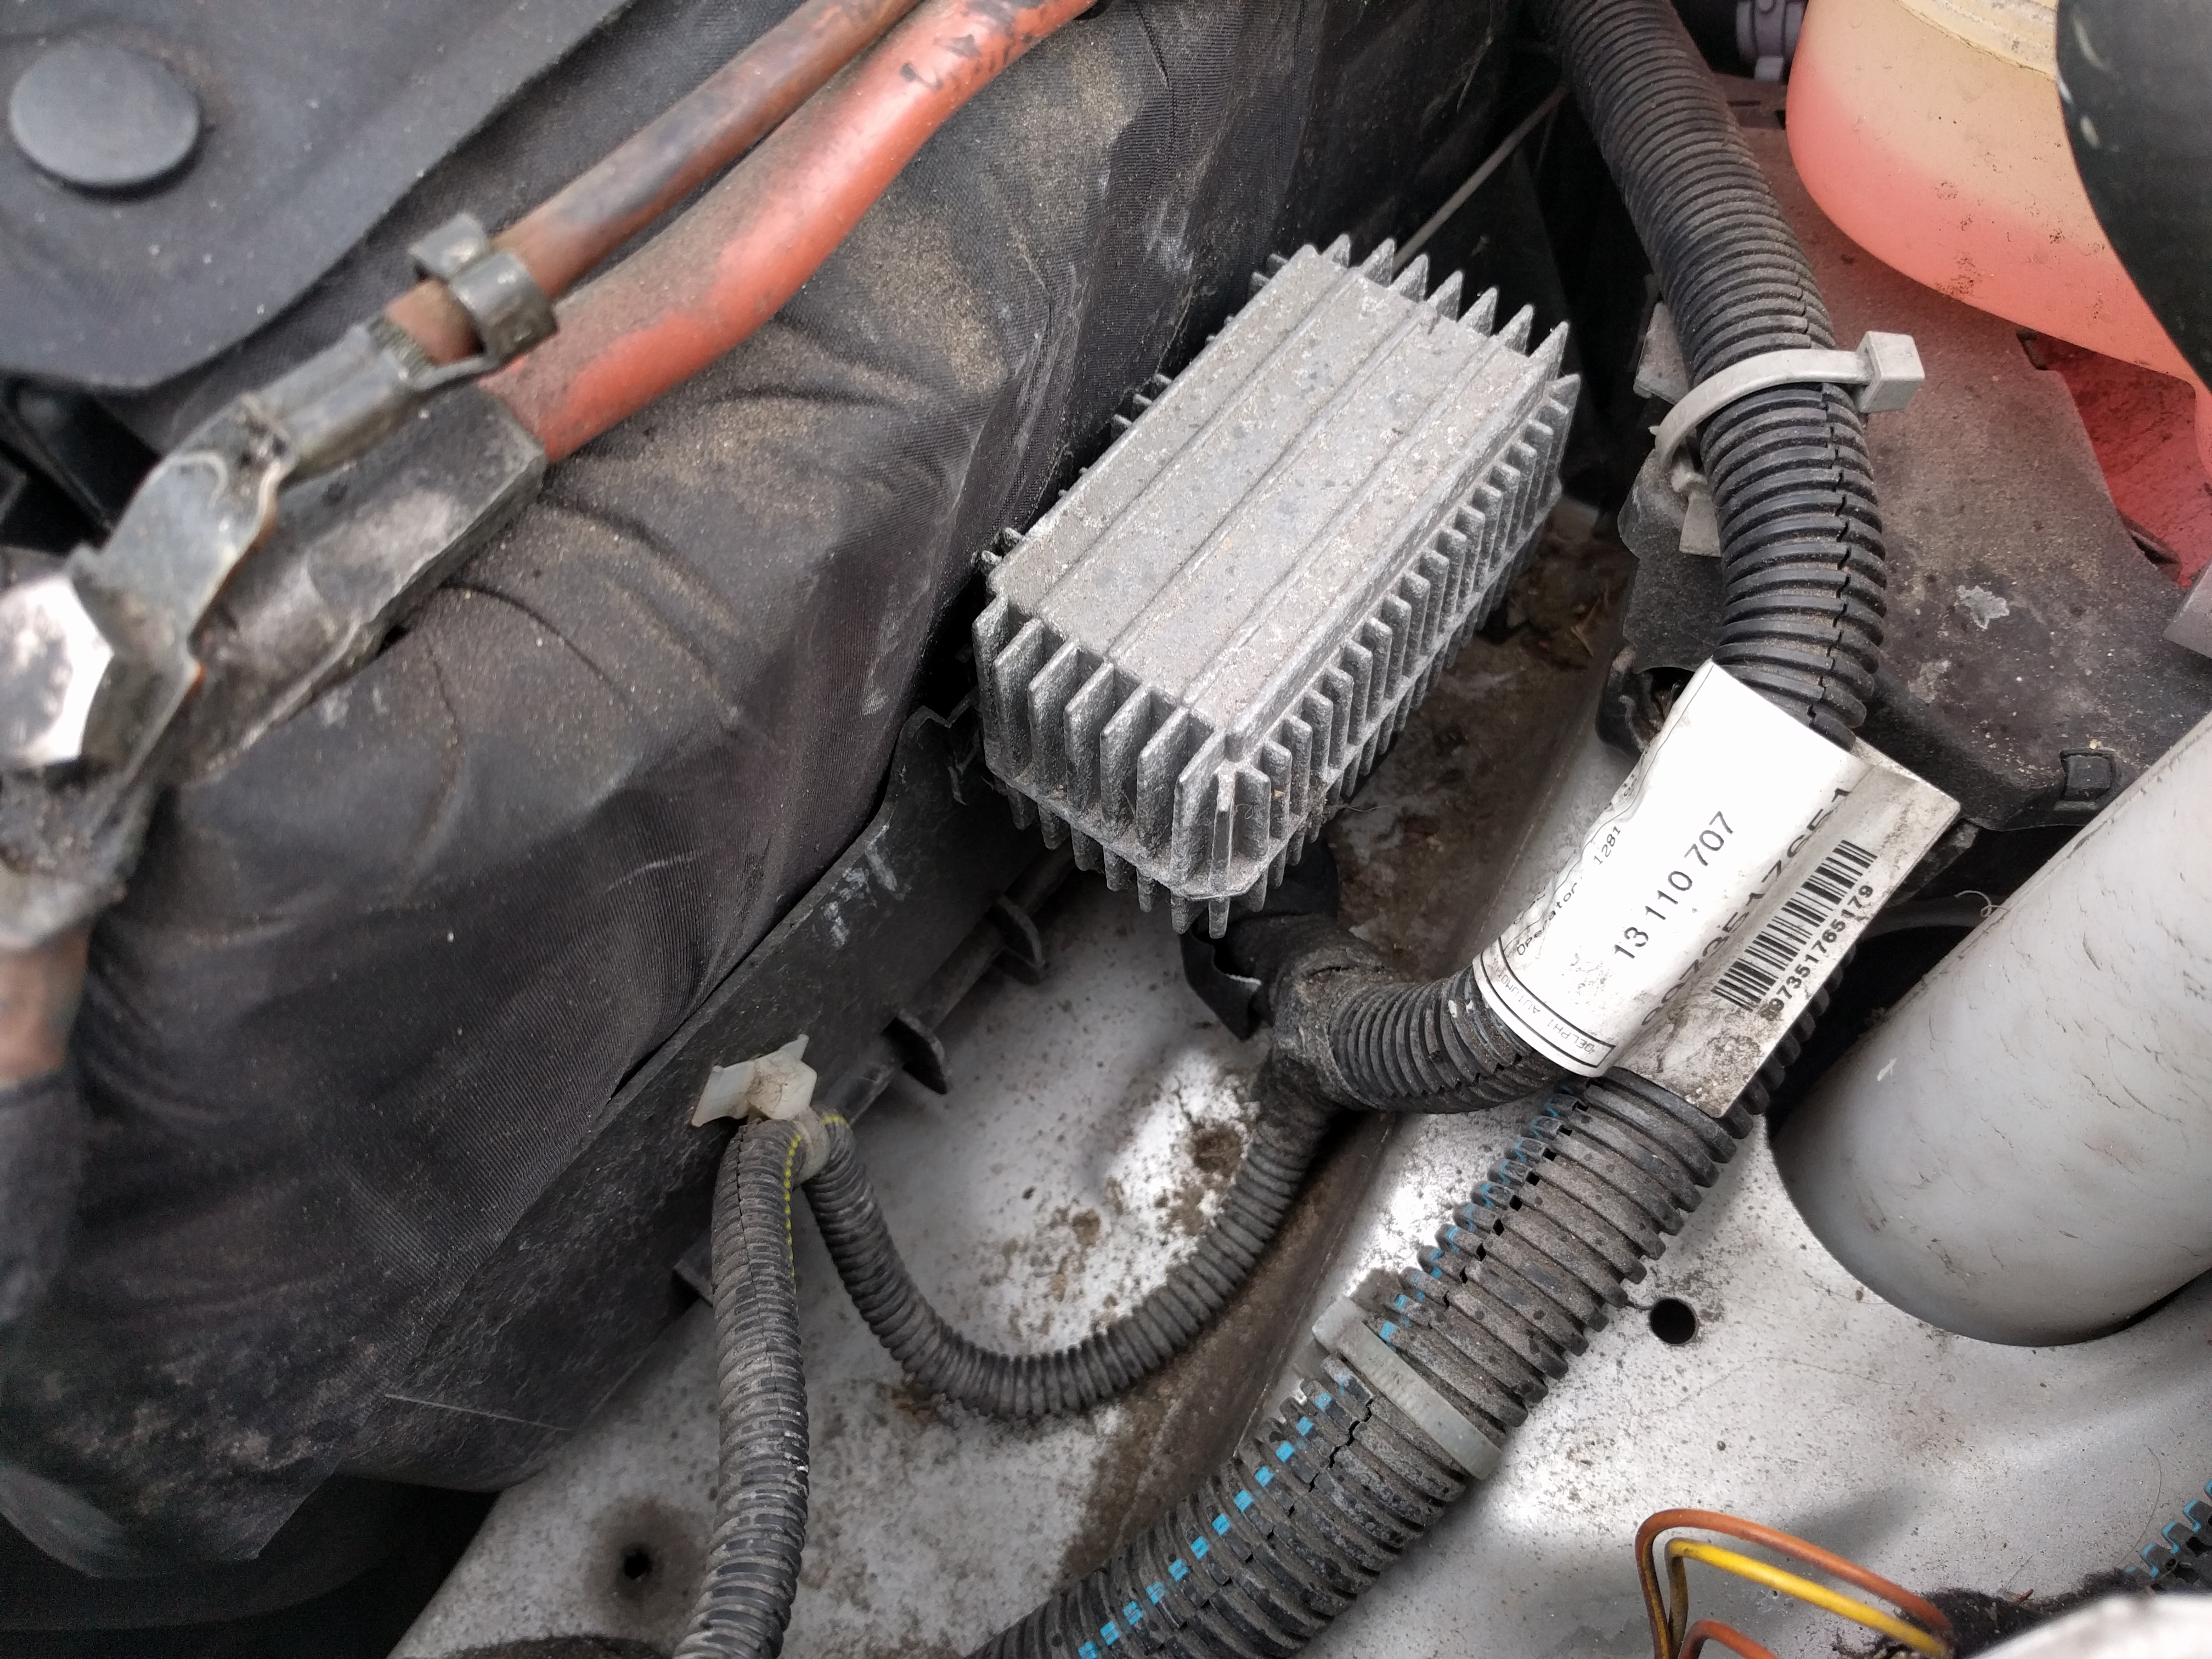
2, To remove simply slide in an upwards direction (don’t pull to hard as there are wires attached)

3, At the bottom of the connector you will see a push clip simply push this in an wiggle/pull the connector/heatsink until they come apart

4, Insert replacement ensuring correct pin alignment
5, Slide back onto battery holder

Vauxhall Astra G Estate 1.7dti Diagnostics – Glow Plug Resistence
SoI have a glow plug fault and to try and narrow it down I thought I would check the resistance of them.
Parts required: Multimeter that has Ohm function
1, Identify glow plug location
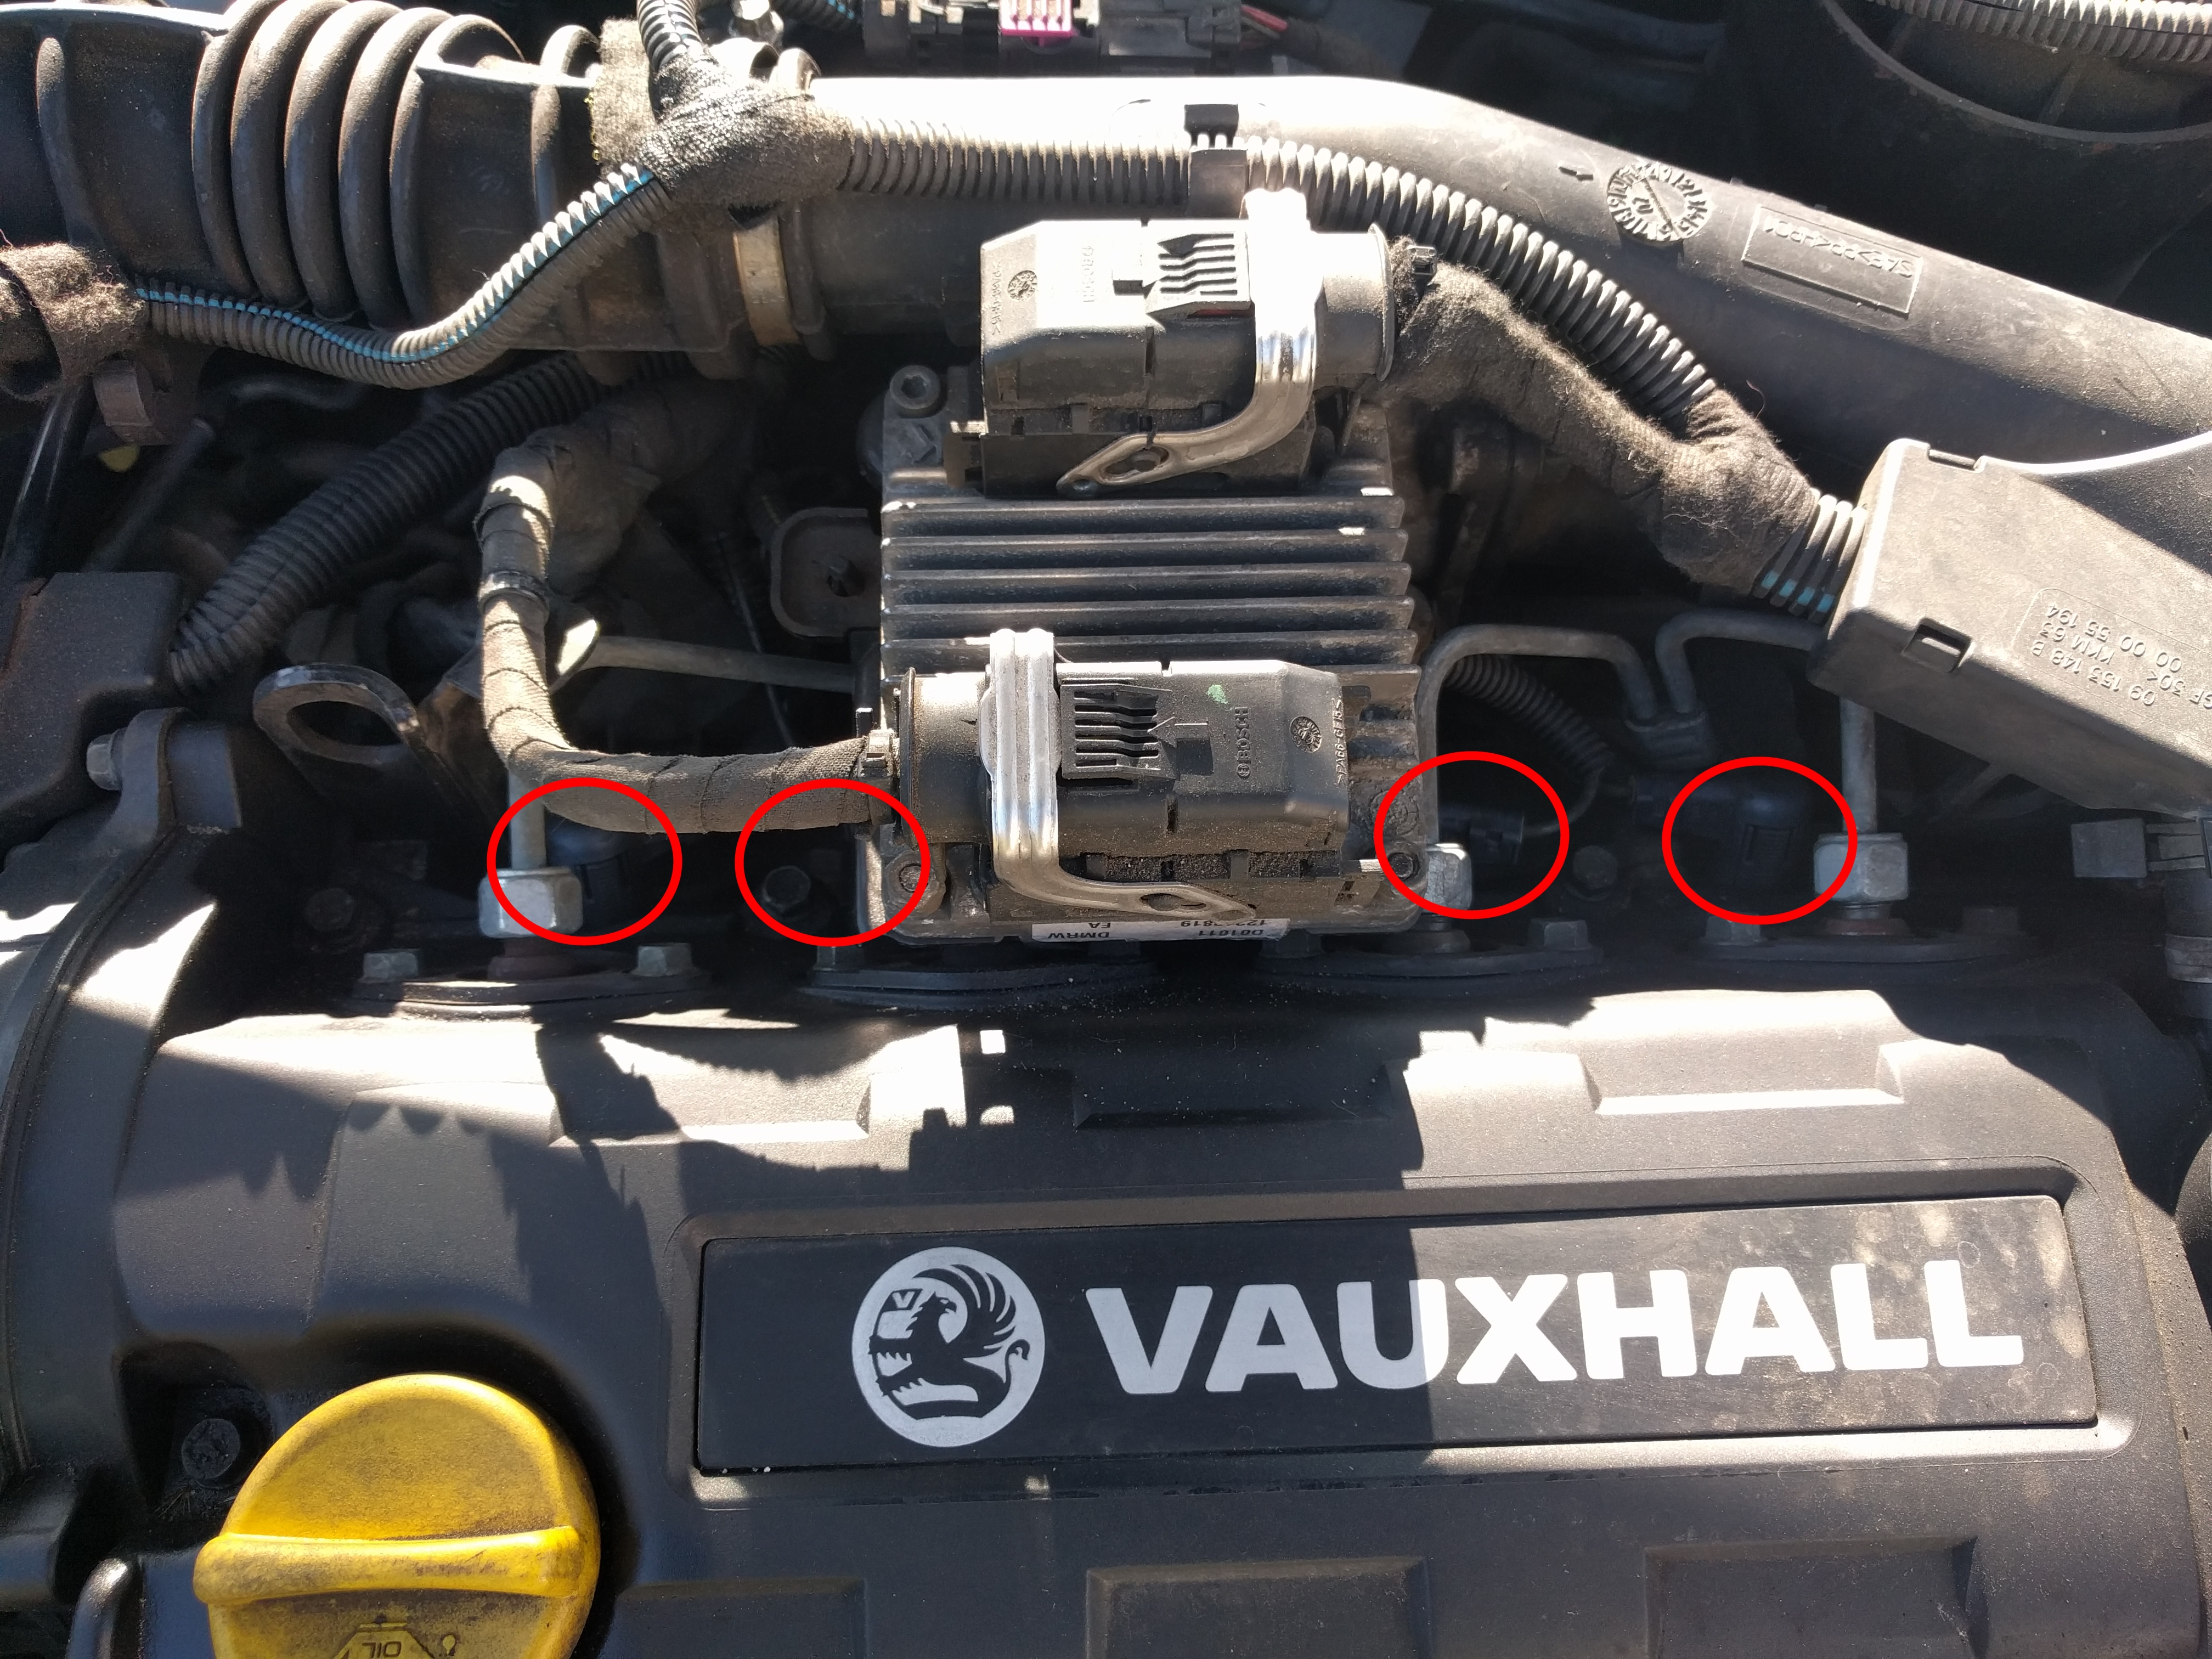
2, The connectors have a serated type plastic on either sides, if you push these in and pull up the connector will come off the glow plug. Note the 2 underneath the ECU can be a bit fidly especially if you don’t have lanky fingers like me 😉
3, Switch on your multi-meter and select the Ohm function. Now to need to find our baseline resistance value. For this touch the positive and negative ends together and you should now get a reading on the screen mine was 0.7 (this value will vary on device quality/calibration etc so don’t worry if it’s not the same as mine).

5, Attach the black probe to the negative post of your battery.
6, With the red probe touch the tip of the first glow plug and your multi-meter should display a value. Mine was 1.3

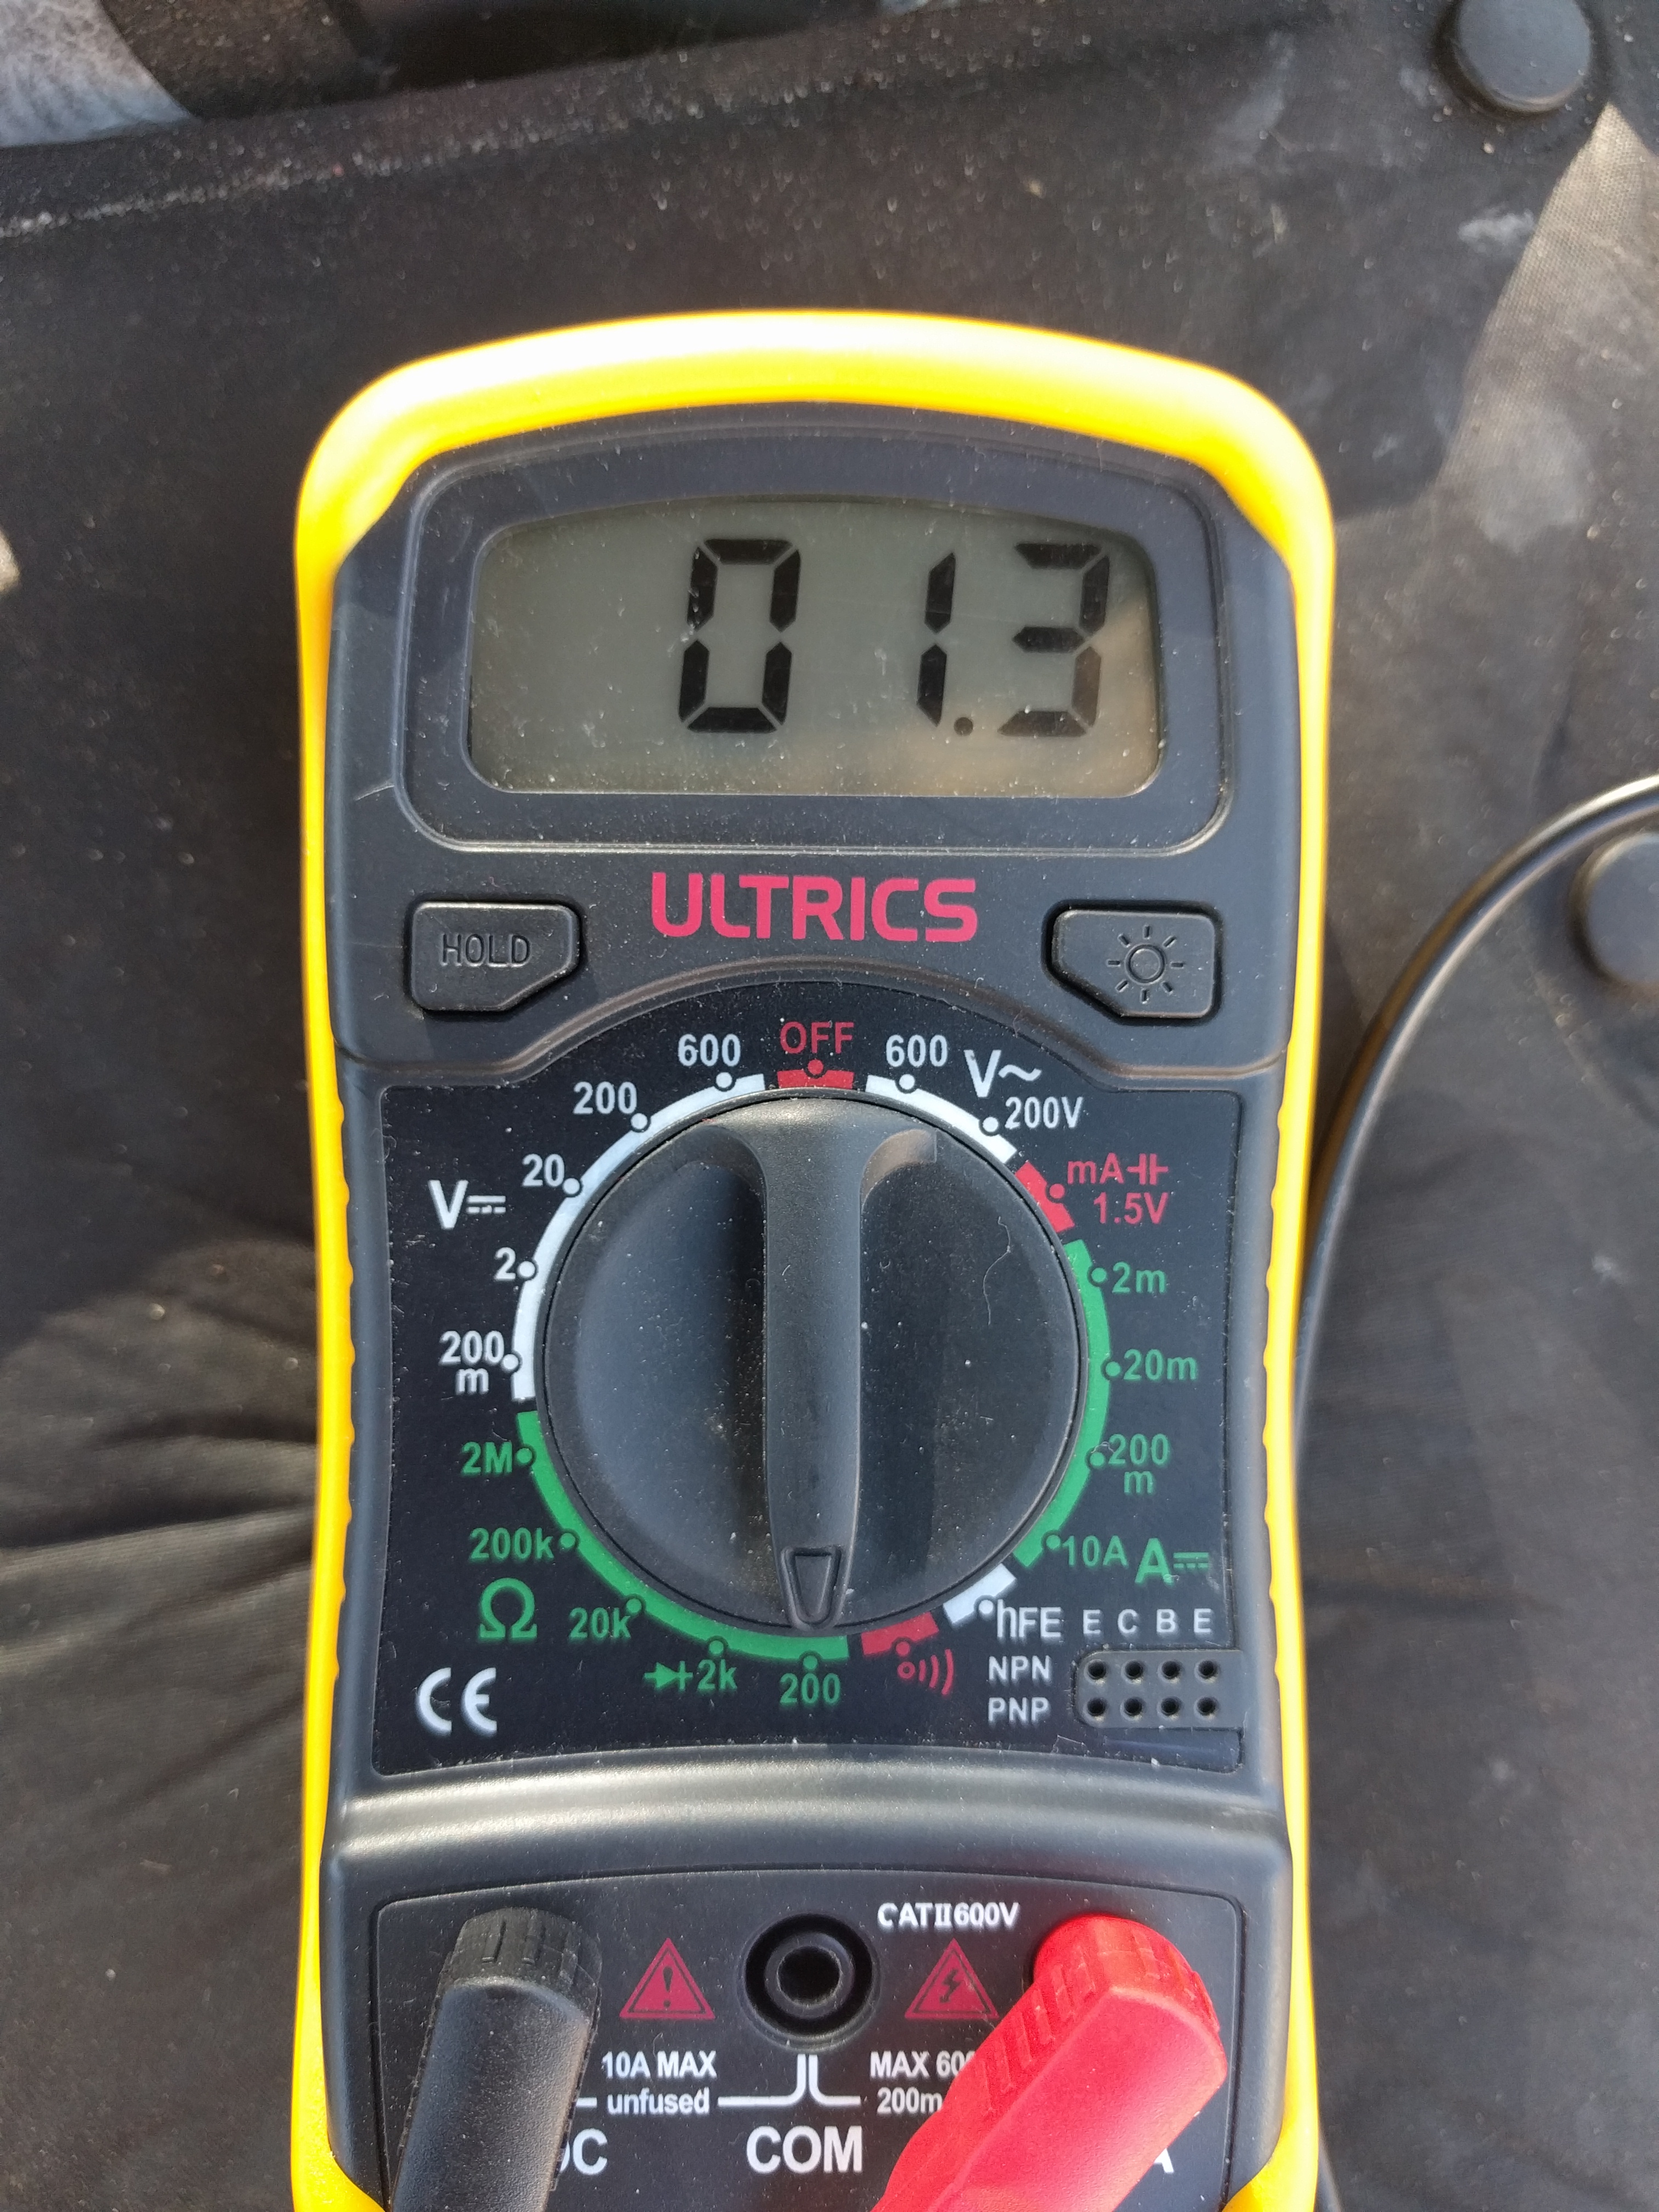
Now the working value range seems to vary greatly depending on which website you read. A few say it should be between 0.1 and 6 ohm but after some reading I concluded that if it’s either zero or stupidly high then it’s likely to be dead. In order to get the resistance value you need to subtract the value gained in step 3 (mine was 0.7) from the value you have just got from step 6 i.e 1.3 so 1.3-0.7=0.6
8, Do the above for each glow plug until you’ve done all four.
Result: Four plug one I got 1.4 plug two 1.3 so all good BUT when I got to plug 3 I got 73.4 which is obviously well out of range, I tested it a few times just to be sure. Plug 4 was 1.4

So it appears my third plug is dead so will be ordering a replacement set.
My Location
London Way, London E20, UK N 51°32’44.26″, W 0°1’06.01″ http://maps.google.com/maps?q=loc:51.54563%2C-00.01833
Find public ip address using linux command line
Putting these here for my reference as much as everyone else’s. Let me know if you have more ways.
wget -qO- http://ipecho.net/plain ; echo
curl ipinfo.io/ip
curl ifconfig.me
curl icanhazip.com
curl ident.me
curl ifconfig.me
Flashing Tomato Firmware On Asus RT-N16
Due to the aging performance of my Linksys WRT54GL I picked up a cheap Asus RT-N16 router to flash tomato firmware on so thought i’d do a quick howto.
This was carried out using a Windows 7 machine.
Files
Download the ASUS Firmware Restoration Utility (was a nightmare to find as it’s no longer available on the Asus website)
Download your chosen verison of tomato firmware i.e tomato-K26USB-1.28.RT-MIPSR2-114-AIO
1, Set a static ip of 192.168.1.10 on your PC network interface
2, Plug an ethernet cable from your PC to one of the router LAN ports
3, On the router hold down the black reset button (next to the WAN port don’t get mixed up with the WPS button)
4, Insert the power cable into the router
5, The power led will start to flash quickly
6, When the power led goes out release the reset button
7, The power led should now be flashing slowly
8, Open the Rescue_RT_N16_1902.zip file you downloaded earlier and extract the Rescue.exe file contained within
9, Run the Rescue.exe file
10. You will now be shown the following screen
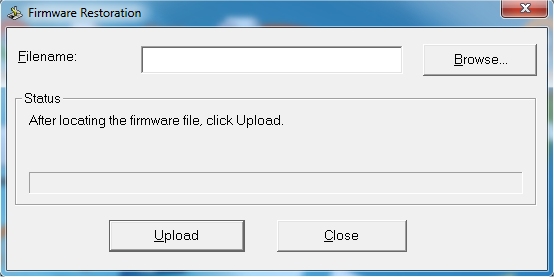
11, Click ‘Browse’ Select the tomato firmware you downloaded earlier

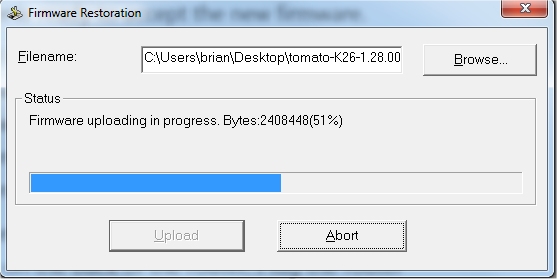
12, Click ‘Upload’ the file will then be uploaded to the router
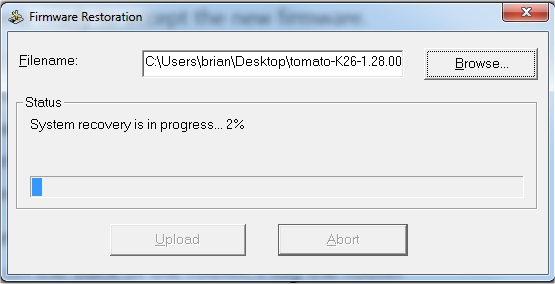
13, After it’s uploaded it will then do a ‘System Recovery’
14, When complete you will then get this screen
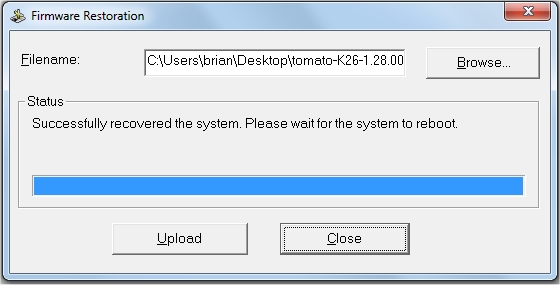
15, Open a browser to 192.168.1.1 and you should be able to login to tomato with admin/admin (I recommend resetting your configuration to defaults including NVRAM after doing so)
N54L microserver Nas retirement
So my HP N54L microserver has served me well (pun intended) but recently I have been quickly using up storage and now down to my last 500gb on my pair of raid 1 3tb drives. Over the years I have been running more and more demanding software and now the N54L CPU is beginning to become a bottleneck. I already have a re replacement server in mind and just finalising spec.
My Location Giardino Zoologico
Viale del Giardino Zoologico, 2, 00197 Roma RM, Italy N 41°55’00.60″, E 12°29’15.41″ http://maps.google.com/maps?q=loc:41.91683%2C12.48761
My Location Viale dei Pupazzi
N 41°54’44.08″, E 12°29’13.68″ http://maps.google.com/maps?q=loc:41.91224%2C12.48713