
So had an issue on my windows 10 machine that every time I right clicked a folder explorer would crash. One of the reasons is the ‘quick access’ feature can become too full, this fix worked for me. Open File Explorer Right-click Quick Access Select “Options” Under Privacy click the Clear button After doing this right click began to work ok again, if your regularly coming across this issue then it may be better just to disable this function completely.
LK210 Waterproof GPS GSM SMS Auto Car Real Time Tracker Tracking Anti-Theft Alarm Review
I ordered this from China based ebay seller for £13.29 on 09/03/16 it was posted on 12/03/16 and arrived 24/03/16 so thought id do a quick review.

Vauxhall Astra G Estate 1.7dti Servicing – Part 2 Cabin Pollen FIlter
On previous cars i’ve found these filters are generally missed by home mechanics as well as garages.
Parts Required: Pollen filter – I used a Bosch one as it was only a couple of pound more than another brand from eurocarparts

Tools Required: xxx hex bit
5.5 socket (or 7/32 if you don’t have one)
1, Identify and remove 3 hex bolts at bottom of glove box.

2, Open glove box and remove 3 further screws (make sure you support it when removing the last one as the light is attached).

3, Disconnect glove box light by simply pushing the back connector backwards.

4, Identify the pollen filter housing cover and remove 2×5.5mm bolts.

5, Remove the housing cover – There are a couple of awkward clips at the top and bottom so don’t just try and pull it off as they will break, I found just twisting and getting the bottom out then the top worked.
Picture of the cover as you can see someone has previously broken one of the clips!

6, Remove old filter, it won’t come out ‘straight’ so you will need to twist it slightly.

As you can see the person who previously fitted mine managed to crease it.

After removal if you look on the end of the filter it will have some directional arrows, these ‘should’ point inwards towards the centre console when fitted and not towards the bulkhead/engine bay.

Old vs New

7, Now before fitting the new one I recomend you refit the old one a couple of times so you can see how it goes in and how easy it is to crease it. I refitted mine by inserting it like this (DONT FORGET TO HAVE THE ARROWS POINTING TOWARDS THE CENTRE CONSOLE).

and rather than pushing it in from the end I ‘fed’ by alternately pushing in the top and bottom part nearest to the holder.

It ended going in nicely with no creases.

8, Refit cover
9, Insert glove box halfway and reconnect light.
10, Screw in six glove box screws.
JOB DONE!
Vauxhall Astra G Estate 1.7dti Servicing – Part 1 Air Filter
So picked up another Astra estate and first thing I thought I’d do is give it a service, I always service my own vehicles and found lots of great info on the internet so thought i’d make a few blog posts about how to do it.
Air Fliter
Pretty straight forward this one.
Parts Required: Air filter – I used a Bosch one as it was only a couple of pound more than another brand from eurocarparts

Tools required: None
1, Locate the air filter box in the o/s of the engine bay.

2, Unclip the 4 metal lid fastners.

3, Lift the lid while angling it to clear panel by the headlight.

4, Remove existing filter (my old one was actually pretty good and still usable)

Old vs New

5, Remove/hoover any debris from airbox

6, Fit new filter, replace lid and secure clips.
BT Infinity Youview IPTV with Asus RT-N66U Settings
So I recently switched to B.T due to the daylight robbers that are sky only offering me £3 per month discount off full price on renewal of my contract.
I’ve signed up for BT Infinity 1 unlimited their phone package and also their YouView TV package.
On my sky setup I used a BT OpenReach (BTO) modem along with an Asus RT-N66U Dark Knight router running Merlin firmware and it all worked very well and I had everything setup as I wanted so when it came to switch over I was loath to use the BT Home Hub, and this is how I did it….
NOTE: My router is running Merlin Firmware:378.56_2 make sure you backup your settings before carrying out the steps below. I suspect they will work on STOCK firmware but it’s UNCONFIRMED at this stage.
1, Login to router and go to the WAN –> Internet Connection page and change these settings
Connection type to PPPoE
PPP Username bthomehub@btbroadband.com
Password anythingyouwant (The password can be anything you want but it MUST have something entered as leaving it empty will stop it working)
Enable VPN + DHCP Connection No (On sky I had this previously enabled so if you did as well make sure you disable it.
Your page should now look like this

Click Apply
This will allow your router to login to the BT Infinity Servvice and use your broadband but if you try and go to an internet channel on your YouView box you’ll get Error Code IPC-6023 this is because further configuration is required to get IPTV to work, now go to step 2.
2, Next go to the LAN –> IPTV setting and use these settings
Select ISP Profile None
Choose IPTV STB Port None
Use DHCP routes RFC3442 & Microsoft
Enable multicast routing (IGMP Proxy) Enable
Enable efficient multicast forwarding (IGMP Snooping) Enable
UDP Proxy (Udpxy) 0
So you should end up with
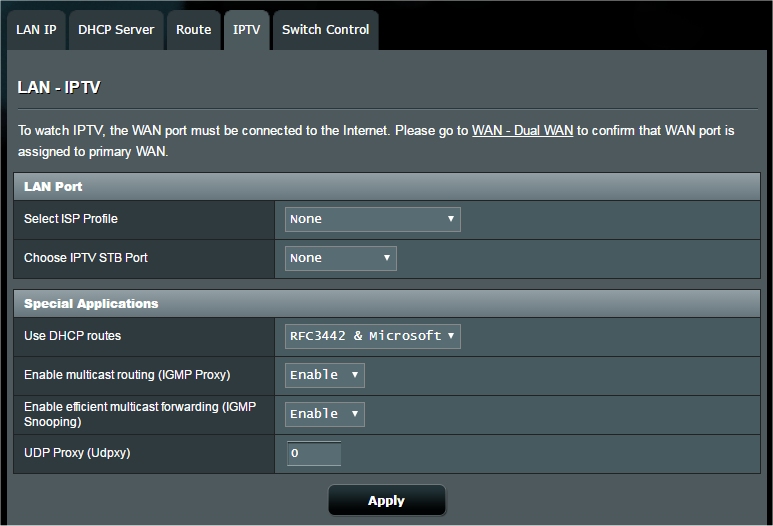
Click apply
When I again went to the subscription channel I got error IPC-6023 again? rebooted the YouView box and again got the error, next I REBOOTED THE ROUTER and this time I got a picture but it was very pixelated.
![]()
After a lot more searching and trying of settings I used these.
3, Goto Network Map –> View List and find your BT youView box it will most likely be called HUMAX and make a note of it’s ip address (You can also rename it, I changed mine to YouView for easy finding)
Next go to LAN –> DHCP and scroll to the bottom where it says ‘Manually Assigned IP around the DHCP list (Max Limit : 128)’
In the MAC Address dropdown box find the ip address you noted earlier and it should have HUMAX (or whatever name you set next to it) click this so the box is populated.
Next we are going to assign assign it an ip address based on its MAC address. In the next box it will have already been populated with the IP you found earlier you can either leave it as this or set your own if you like your devices to be sequential etc. Next click the + sign you should then end up with something like this.
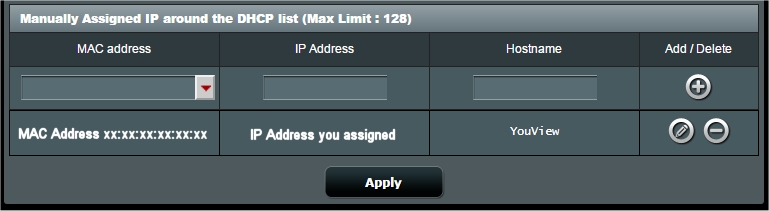
Click apply
4, Goto WAN –> Virtual Server / Port Forwarding
Service Name enter something relevant that you will remember, YouView, IPTV etc.
Port Range 1024
Local IP (The one you assigned to the YouView box in step 3)
Local Port 8081
Protocol TCP
Click the + sign and you should end up with this
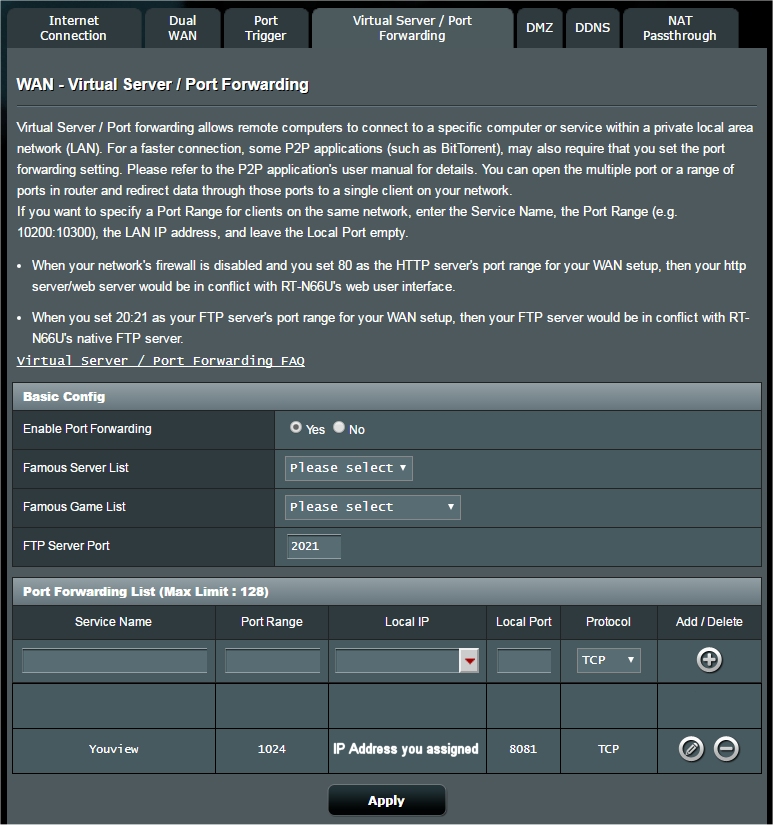
Click apply then reboot your router wait for it to come back then reboot the YouView box goto an internet channel you’ve subscribed to and it should now display correctly.
Can’t load firmware file bnx2/bnx2-mips-06-06.2.1.fw
While installing Debian 7 Wheezy on a Dell 1950 III I encounted the following error
Can’t load firmware file bnx2/bnx2-mips-06-06.2.1.fw
which is caused by the missing broadcom network driver. I fixed this by downloading http://www.theoutpost.org/downloads/firmware-bnx2_20160824-1_all.deb onto a linux machine and extracting the .deb file using
ar vx firmware-bnx2_20160824-1_all.deb
which created
x – debian-binary
x – control.tar.gz
x – data.tar.xz
then extract the data file
tar xf data.tar.xz
which created folders lib and usr.
cd /lib/firmware
Now copy the bnx2 directory into the root of a usb flash drive (it must contain the folder bnx2 folder itself and it’s contents) Now insert into the machine your installing on and hit enter when prompted.
My Location Wookey Hole
Wookey Hole Wells BA5 UK N 51°13’40.79″, W 2°40’17.21″ http://maps.google.com/maps?q=loc:51.22800%2C-02.67145
My Location
Old Station Approach Burnham-on-Sea TA8 UK N 51°13’47.55″, W 2°59’56.51″ http://maps.google.com/maps?q=loc:51.22988%2C-02.99903
Cryptocoin Mining With Raspberry Pi
Now i’ve clearly missed the boat on bitcoin mining and it seems that unless you have a datacentre crammed full of racks with hardware you can’t make any decent return on it. An ex colleague of mine did ‘well’l on it at one point but not sure if he’s still running it these days. That said it’s something i’ve always been interested in and with a pi sitting idle I thought I would give it a go.
Hardware
Raspberry Pi Model B + Case + PSU
Transcend 4GB Class 10 SD Card
7 Port Powered USB Hub (I had a spare anker usb 3.0 one)
SD card reader/writer
Arctic usb powered fan (the asics run hot!) £5.99 at the time of this article
Software
How To
Download and install Win32 disk imager
Download the Minepeon pi image file from their site i’ve also hosted it here MinePeon-0.2.4.6-RaspberryPi.img.zip sha256sum 3b85225252795e53e22f23b07bf54a3423db73112e78f022023b55ec825fe82c as per https://downloads.mineforeman.com/minepeon/sha256sum.txt
Extract the image file
Insert SD card into your reader
Run Win32 disk imager
Select your sd card device on the right i.e [H\] WARNING make sure you choose the correct drive letter or you may end up erasing the wrong drive!
Click the folder icon and browse to the image file you extracted earlier.
Check the destination drive letter is right!
Check the destination drive letter is right!
Click ‘Write’
Once the image has been written stick it in your pi
Connect pi to a monitor and ethernet port on your router
Switch on the pi, the boot screen will load and it will try and obtain an ip via dhcp, it boots really quickly so i missed the ip it got so I did an nmap to find it.
Put the ip into your browser and you will probably get a security warning (just accept it).
Login with
Username: minepeon
Password: peon
You should be greeted with the main dashboard.

The settings menu allows you to change your password, restart miner ever x hours, define SHA cores on dual mode and specify update url.
The help menu unfortunately only displays “Work in progress”
Update allows you to update Hashra, when I clicked on it it stated “A newer version is available, do you want to Update?” but I have decided not to do this for now.
Back on the dashboard I ntoced that it said “Running in SCRYPT mode” obviously if your only wanting to mine Litecoin for example you can leave it set to this. Below are some mining stats/hash rate etc.
The final selectable options are Scrypt SHA256 and Dual which you’ll need to set depending on what you want to mine, after choosing you will need to ‘Save and restart’.
Coin Mining With Raspberry Pi And Gridseed 5 Mini Part 1
While researching bitcoin mining hardware and was considering purchasing the Antminer U3 as I liked it’s apparent ease of setup and higher hash rate then a usb asic I stumbled upon the Gridseed 5 Chip Dual ASIC Miner GC3355. The Gridssed had similar form factor but the added bonus that it is a dual miner and can do either SHA-256 (Bitcoin) OR Scrypt (i.e litecoin) and even both simultaneously.
Specifications
Dimensions
9.5cm x 7cm
Weight
418 grams
Power input
12v DC input
Cooling
Large heatsink and fan ensure it runs cool
| Mode | SHA256 (Bitcoin) | Scrypt (Litecoin/Dogecoin) | Power Consumtion (watts) |
|---|---|---|---|
| Dual Mode | 8 gh/s | 300 kh/s | 60 watts |
| Scrypt Only Mode | OFF | 330 kh/s | 7 watts |
Software
As it was always the intention to use my spare Pi B as the controller I spent some time looking for suitable compatible software. One thing I wanted specifically was a web based control panel so I could setup monitoring on a seperate screen and for the ease of learning what all the differnet numbers mean.
I cam across this useful blog post on cryptomining-blog I narrowed my choice down to Scripta and Hashra. On the post they gave the highest props to Scripta however a downside is that it supports SHA-256 (Botcoin) mining only. While this is new to me I didn’t want to limit myself to just Bitcoin so the obvious choice was Hashra as it supports scrypt only (bfgminer), SHA-256 (cgminer) only or dual-mining mode (cpuminer + cgminer).
After managing to win one on ebay I obviously decided to drop my previous BTC/Minepoen project.
How To
Download and install Win32 disk imager
Hashra, they have different images on their site to use depending on your hardware choice. As I will be using the Gridseed 5 Mini I downloaded the following image HASHRA MINI CONTROLA FIRMWARE DOWNLOAD I have also hosted it on theoutpost as an alternative location. sha256sum 7FC32B10DD6CC9B1046954159E9808DB356112A7D686C9597178873F546D1A0E
Extract the image file
Insert SD card into your reader
Run Win32 disk imager
Select your sd card device on the right i.e [H\] WARNING make sure you choose the correct drive letter or you may end up erasing the wrong drive!
Click the folder icon and browse to the image file you extracted earlier.
Check the destination drive letter is right!
Check the destination drive letter is right!
Click ‘Write’
Once the image has been written stick it in your pi
Connect pi to a monitor and ethernet port on your router
Switch on the pi, the boot screen will load and it will try and obtain an ip via dhcp, once it’s finished booting just before the login prompt it should display it’s ip address.
Put the ip into your browser i.e http://192.168.1.211/ and you should get the login page

Login with
Username: hashra
Password: hashra
You should then see the main dashboard.
The settings menu allows you to change your password, restart miner ever x hours, define SHA cores on dual mode and specify update url.
The help menu unfortunately only displays “Work in progress”
Update allows you to update Hashra, when I clicked on it it stated “A newer version is available, do you want to Update?” but I have decided not to do this for now.
Back on the dashboard I ntoced that it said “Running in SCRYPT mode” obviously if your only wanting to mine Litecoin for example you can leave it set to this. Below are some mining stats/hash rate etc.
On the right are boxes for you to set your mining pools and adjust the clock rate of your miners.
The final selectable options are Scrypt SHA256 and Dual which you’ll need to set depending on what you want to mine, after choosing you will need to ‘Save and restart’.
After this I logged into the pi via ssh using
User: pi
Password: 3K4Hb8FMeZjQZJEX6scYzZa
I was happy to find that it was running Raspbian GNU/Linux 7 \n \l with apt-get etc installed as well as sudo.